
This is my first recipe from this book and I even managed to find a video by Jeff Hertzberg demonstrating this recipe on a television talk show.
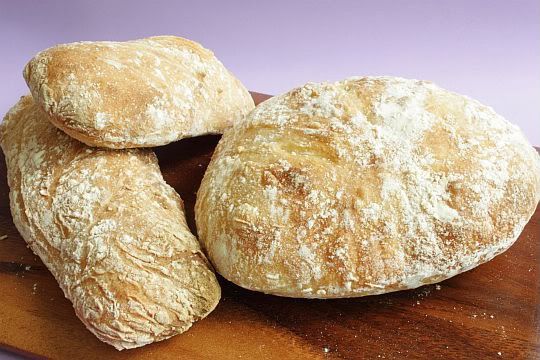
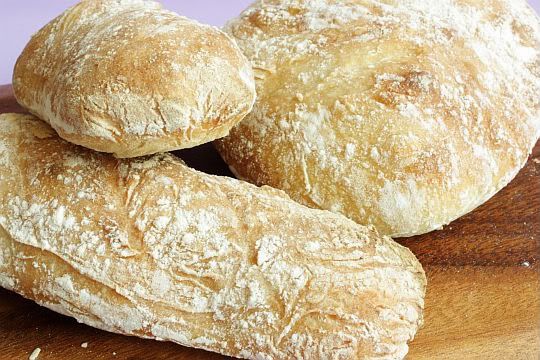
This a really, really easy recipe to do! And I'm not bluffing! If it's your first time attempting bread you may want to try this. No kneading is required. All the ingredients are dumped into one bowl, let the dough proof for a couple of hours and then chuck the whole thing into the fridge for one night. The next day remove the dough from the fridge, shape it, let it proof again and then bake. What more could a baker ask for! I even left the dough in the fridge for 3 nights before baking it. I shaped the dough into one large loaf and was proofing it for about 30 minutes before I realized that I was not satisfied with the shape. I grabbed the proofing dough, punched it down again and reshaped it into 3 separate loafs. I wasn't sure if the dough could take such treatment after this ... but guess what! It did! I was totally amazed and the loafs turned out exactly as they should have.
The crust is nice and crisp and chewy, and the longer the dough sits, the more it develops a sourdough flavor. The dough can be used for other types of bread by adding dried fruit, nuts or sprinkle oats on top for a farmer's loaf. You can even use the dough for pizzas or naans.
Quick and Easy Artisan Bread
Recipe from "Artisan Bread in Five Minutes"
(makes about 4 medium loafs)
Ingredients:
3 cups of lukewarm water
1 1/2 tablespoons active dry yeast
1 1/2 tablespoons coarse salt
6 1/2 cups all-purpose flour
Method:
1) Grab a very large mixing bowl, or a large container that you can cover. In it, mix the water, yeast, and salt. Just let that sit together for about 5 minutes. Then dump the flour all at once and stir with a wooden spoon. You don’t need to knead this, and you’re not looking to make it come together into a dough ball. You just want everything mixed well, with no streaks of flour left, and you’re done.
2) Leave it in your container, covered (but not airtight, or it’ll pop), for about 2 hours. When it has risen and then deflated a bit, your dough is done. It’s ready to be used or stored in the refrigerator.
To bake the Bread:
1) Just grab a chunk of dough (they recommend a chunk about the size of a grapefruit, but you can use larger chunks). Dust your hands with flour to help prevent sticking, dust the dough with flour and gently pull the sides of the dough toward the bottom, rotating the dough, until you get a roundish shape with a smooth surface. It should only take you about a minute or less to do this. The dough won’t be entirely in the bottom, where it may look bunched up, but don’t worry about it.
2) Put the dough onto a baking sheet or tray that’s been dusted with cornmeal to prevent sticking, and let it rest for at least 40 minutes. No need to cover it. If the dough has been refrigerated, it helps to let it rest a little more, until it’s no longer chilled.
3) Twenty minutes before you are ready to bake, put a pizza stone or baking sheet in the middle rack of your oven, and put a broiler pan in the bottom rack. Preheat your oven to 450 degrees. Dust some flour on the top of your loaf, and make some slashes on the dough, about 1/4-inch deep. (Unfortunately I didn't slash deep enough which is my the end result looks flat)
4) After twenty minutes of preheating, it’s time to bake. (You can put the bread in after 20 minutes, even if your oven hasn’t reached 450 degrees yet.) Slide the loaf onto the baking stone or sheet, and then quickly pour 1 cup of hot tap water into the broiler pan. Then quickly shut the oven door to keep the steam inside.
5) Bake for 30 to 40 minutes, until you get a nice brown crust. It tastes best when you let it cool completely. Don’t worry if your beautiful crust seems to soften a bit. It will harden again.
I served my slices of Artisan Bread with a smear of tapenade and topped it with a simple salad made of cherry tomatoes, diced red onions and cucumber and seasoned it with black pepper, salt, fresh basil, balsamic vinegar and olive oil. It made a great Sunday brunch!


21 comments:
Looks like it came from a bakery!!
The last shot look so tempting to me, well done.
Cool! They look so professionally baked!
I've bought the book some time back but yet to try out any recipes. Your bread looks fab, perhaps I should start reading it hehe
Wow looks amazing! if it's quick and easy I shall have to give it a go.
They look lovely and not too difficult to make. My new year resolution is to start making bread. Hopefully I will get around to do it soon.
Thanks for sharing this! I am running out of idea what to eat on every sandwich day.
This is a recipe I must try. I've been baking for some time now but never tried a No-Knead recipe ... so this will be my first.
And great photographs, especially of the bread with tomato salad piled on top.
Sounds easy to make and the breads look so perfectly crusty and delicious!
wow love crusty bread! Yours looks perfect!
Beautiful! I love this bread but had to stop keeping it in the fridge because we just ended up eating way too much bread.
Jo, did I see wrong? Regular flour? That's fantastic! I hate to get bread flour ... always stuck with excess that is either neither here nor there. Beautiful loaves! You had my full attention. :)
Hi all, thanks for dropping by.
Hi noobcook, mine was gathering cobwebs as well until I chanced upon this recipe.
Hi Shellie, Ellie, you have to give bread a try. Once you get over your 1st hurdle, you'll love making it. Nothing like shaping and kneading to get the stress out.
Hi Gaga, I'd probably be trying this recipe a lot more from now on.
Hi Ju, you got it right - it uses plain flour. Haha I have all sorts of flour in my cupboard. Plain, self-raising, bread, cake, tapioca, glutinuous rice. I need a new kitchen!!
Wow, this could be my next bread attempt... It is really a tempting recipe! Great convincing pictures too!
Sawadee from bangkok,
Kris
great recipe. tip: oil the bowl before you start making and then the dough comes out more easily (and washing it up afterwards is much easier too!)
I really loved reading your blog. It was very well written and simple to undertand. Unlike additional blogs I have read. I also found it very interesting. In fact after reading, I had to go show the spouse and she ejoyed it as well!
Banana Nut Bread
We also now have a British version with weights rather than American cup measures as the basis for the quantities in the recipes. It's called Five Minute Bread, here on Amazon UK at http://www.amazon.co.uk/Five-Minute-Bread-revolutionary-kneading/dp/0091938945
Jeff Hertzberg (co-author)
BreadIn5.com
Hi Jo,
What cup did you use for this recipe, it looks really easy wanted to try or do you have the weight of the flour & water??
Thanks in advance.
Maybe you will want to add a facebook icon to your blog. I just marked down the blog, however I had to complete it manually. Just my 2 cents.
Hello,
thank you for your recipe
the bread came out great!
yum.
I made this last night but I thought I had to put it in the fridge from 2-24 hours! Will it still work?!
Post a Comment