Tuesday, September 30, 2008

Roast Chicken with a Thai Twist

We decided to eat in last weekend and have something simple, no fuss and no messy dishes to wash up! Don't you simply hate washing up especially on your "off day"! So I was thinking why not a simple roast chicken and salad. I asked my husband if he ever had a Thai version of roast chicken and the answer was no. Well, he's definitely going to love this one then!

Did you know that your Thai green curry paste could be used as a marinade for roasting chicken .. bet you didn't know this! The flavours of the green curry mixed with coconut milk gives an added sheen to your roast chicken, not forgetting the combined flavours of kaffir lime, sweet basil, lemongrass in the paste and a tinge of heat from the ground chillies! Wouldn't this be a great marinade for your normal roasted turkey for your Christmas dinner!


Roast Chicken with Green Curry Paste
(serves 4)

Ingredients:

1 1/2 kg chicken
1 cup coconut milk (you can substitute with milk)
3 Tbsp thai green curry paste
2 Tbsp fresh ginger, grated
2 Tbsp lime juice
2 tsp fish sauce
1 Tbsp palm sugar

Method:

1) Wash and pat dry the chicken.

2) Combine all ingredients into a bowl and mix thoroughly.

3) Pour mixture inside and over chicken.

4) Cover the chicken and allow to marinate in fridge for at least 2 hours (longer will be better)

5) Remove marinated chicken from the refrigerator. Transfer to a wire baking tray and let stand for 10 minutes. Reserve the marinade into a bowl to be used for basting the chicken.

6) Cover the top of the chicken with foil and bake in preheated oven of 200C for about 1 to 1 1/2 hours. After about 45 minutes into cooking time, remove the foil and roast the chicken uncovered in order to crisp up the skin. Baste the chicken with the marinade and continue roasting.

7) In the final 15 minutes of cooking time, remove chicken from the oven and pour the remaining marinade over the chicken. Continue to roast until cooked through. To test to ensure that the chicken is well cooked, use a fork to pierce into the chicken thigh and if no juices flow out, your chicken should be cooked.

8) Serve roast chicken with a side salad or with rice.


Saturday, September 27, 2008

A Vegan Challenge .... Lavash Crackers & Dips

This month is history in making for Daring Bakers all around the world. It's a first ever vegan and/or gluten free challenge. Also another first for our two hosts, Natalie of Gluten A Go Go and Shel of Musings from the Fishbowl

This will their very first hosting and their pick for this month is a recipe for Lavash Crackers from Peter Reinhart's The Bread Baker's Apprentice book. The challenge does not stop at just making the lavash, we also had to include a dip to accompany our crackers. This challenge allowed our imagination juices to flow with our own flavours for the crackers as well as the dip. However there is one tiny rule of thumb, no animal products of any kind is to be used and oats is also to be omitted.


I definitely love this month's challenge even though I had absolutely no clue what a lavash was. I had to look it up on the internet before I realized I'd probably eaten some before in restaurants as part of the bread basket.

The instructions were simple to follow without too many steps and I finished it in no time at all (really unlike past challenges). This time round no collapsing cake or lumpy icing .. haha! Also not forgetting that I didn't have a stack of dirty dishes piled in my sink!! This is one recipe that I'll be making again. Thank you Natalie and Shel!


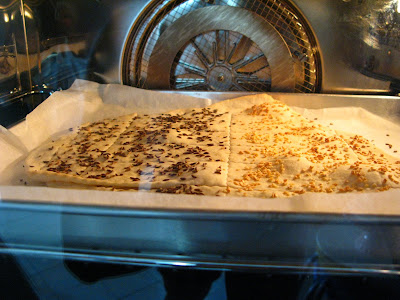
Before embarking on making the lavash I had read somewhere that the key to crisp lavash is to roll out the dough evenly and paper-thin. I decided that my lavash would have garlic flakes, carraway and sesame seeds and italian mixed herbs in a variety of shapes such as rectangles, triangles and twisted cracker sticks. I had also wanted to include poppy seeds as well. But guess what, I couldn't find any store or supermarket stocking it in Singapore. I asked one particular bake shop that I frequently visit and here's what happened.

Me: "Do you sell poppy seeds? I don't seem to be able to find any?"

Store Assistant: "(Expression with eyes wide open) Poppy seeds no, no. It's illegal to sell in Singapore. It's drugs you know, police will catch!"

Me: "Oh ... I didn't know that. No wonder I cannot find it anywhere"

Well there goes my poppy seed idea .... I'm not going to find any at all here! Hmm.. maybe I could smuggle some into the country the next time I'm on holiday!


Lavash Crackers & Dips

Ingredients:

1 1/2 cups unbleached bread flour
1/2 tsp salt
1/2 tsp instant yeast
1 Tbsp honey
1 Tbsp vegetable oil
1/3 to 1/2 cup water, at room temperature

Method:

1) In a mixing bowl, stir together the flour, salt, yeast, honey,oil and just enough water to bring everything together into a ball. You may not need the full 1/2 cup water.

2) Sprinkle some flour on the counter and transfer the dough to the counter. Knead for about 10 minutes, or until the ingredients are evenly distributed. The dough should be satiny to the touch, not tacky, and supple enough to stretch when pulled. Lightly oil a bowl and transfer the dough to the bowl, rolling it around to coat it with oil. Cover the bowl with plastic wrap.

3) Ferment at room temperature for 90 minutes,or until the dough doubles in size. (You can also instead retard the dough overnight in the refrigerator immediately after kneading.)

4) Mist the counter lightly with spray oil, and transfer the dough to the counter. Press the dough into a square with your hand and dust the top of the dough lightly with flour. Roll it out with a rolling pin into a paper-thin sheet about 15 inches by 12 inches. When it is the desired thinness, let the dough relax for 5 minutes. Line a sheet pan with baking parchment. Carefully lift the sheet of dough and lay it on the parchment. If it overlaps the edge of the pan, snip off the excess with scissors.

5) Preheat the oven to 350°F with the oven rack on the middle shelf. Mist the top of the dough with water. Using a pizza cutter cut into rectangles and triangles. Then sprinkle with a covering of garlic flakes, sesame seeds, caraway seeds, italian mixed herbs on to the top of the dough and press the flakes/seeds lightly into the dough sheet (you can use any other spices that you like such as paprika, cumin seeds, anise seeds, kosher salt, etc.) You do not need to separate the pieces, as they will snap apart after baking. If you want to make shards, bake the sheet of dough without cutting it first and once baked, break it up into different sizes.

6) Bake for 15 to 20 minutes, or until the crackers begin to brown evenly across the top (the time will depend on how thinly and evenly you rolled the dough). When the crackers are baked, remove the pan from the oven and let them cool in the pan for about 10 minutes. You can snap them apart and serve with an assortment of dips. (I've included 3 dip recipes below which I had made)
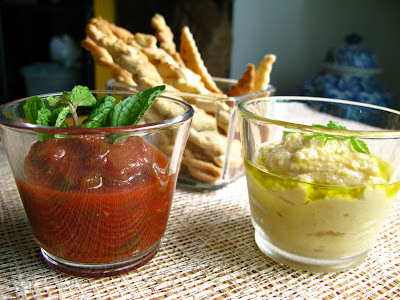


Salsa Fresca

Ingredients:

2 large fresh ripe tomatoes, 1 roughly pureed and the other chopped
1/2 large white onion, peeled and minced
1/4 tsp minced raw garlic, or to taste
1 habanero or jalapeno pepper, stemmed, seeded and minced, or to taste
1/4 cup chopped cilantro leaves
1 Tbsp fresh lime juice or 1 tsp red-wine vinegar
Salt and freshly ground pepper to taste

Method:

1) Combine all ingredients, taste and adjust seasoning as necessary.
2) Let the flavors blend together for 15 minutes or so before serving, but serve within a couple of hours.

Hummus

Ingredients:

1 can chickpeas in brine, drained and rinsed
2 tsp garlic puree
1 lemon, juiced
150 ml olive oil
4 Tbsp tahini
2 Tbsp chopped green onion
Salt and black pepper to taste

Method:

1) Puree the chickpeas, garlic, juice, chilli and olive oil in a blender or food processor.
2) Fold in the tahini and coriander.
3) Season with salt and pepper
4) To serve drizzle some olive oil and spinkle with chopped green onion

Roasted Eggplant and Tomato Dip

Ingredients:

2 medium sized eggplants (700g), skin on
8 small yellow tomatoes, skin on
2 garlic cloves, skin on
1/2 lemon, juiced
2 tsp tahini
1 1/2 Tbsp extra-virgin olive oil
2 Tbsp green onions, finely chopped

Method:

1) Preheat oven to 200°C. Line a baking tray with baking paper. Slice the eggplant in half and place skin up onto a baking tray. Add the garlic and tomatoes. Drizzle with a bit olive oil and roast for 35 to 40 minutes or until vegetables are soft. Set aside to cool for 15 minutes.

2) Remove skin from the eggplant and tomatoes. Using a metal spoon, scoop out flesh onto a chopping board. Roughly chop. Transfer to a bowl.

3) Squeeze flesh from garlic into a small bowl. Add 2 tablespoons lemon juice, tahini, 1 tablespoon oil and salt and pepper. Mash with a fork until well combined. Stir into eggplant with three-quarters of the green onion. Transfer to an airtight container. Cover and refrigerate until ready to serve.

4) To serve spoon dip into a bowl. Drizzle with remaining oil. Sprinkle with remaining green onion.


Wednesday, September 24, 2008

Hot Cross Buns

As a young girl (god knows that was such a long time ago) I remembered that hot cross buns was something that we'd get to savour during Easter time.

Did you ever wonder how hot cross buns came about? Well, there are conflicting stories as to it's exact origin. The buns have been associated with Easter tradition since the 1300s when a monk distributed the buns to the poor on Good Friday. However, the symbol of the cross pre-dates Christianity, and the buns may have originally been exchanged at pagan holidays like the Solstice, with the cross symbolizing the change of seasons and phases of the moon.

According to one story, hot cross buns were wildly popular in the pagan community, and the early Christian church attempted to ban them. Elizabeth I of England supposedly legalized the buns by associating them with Christian holidays. This story seems somewhat doubtful given that hot cross buns had been a part of Christian celebrations since before the birth of Elizabeth, and that the Christian church does not generally wage war declare war on pastry.

Wherever the buns came from originally, they have become extremely popular. It is now not just eaten during Easter but can be found in bakeries all year round. However it does have special significance especially around Easter time.


Whipping up a batch of hot cross buns at home is a different experience from buying it at the bakery. They are so much better and you can tweak it to your liking. There is really nothing like freshly baked buns with a dollop of cold butter, your favourite jam spread and some honey.

Dare I also say that this is my ever first batch of hot cross buns, it taste great even though the rolls aren't very well rounded. My next batch will surely be better looking!


Hot Cross Buns
Source: Lynne Mullins ,The Sydney Morning Herald
(makes 16 rolls)

Ingredients:

1/3 cup caster sugar
2 x 7g sachets dry yeast
1 1/2 cups warm milk
600g plain flour
Pinch of salt
1 1/2 tsp ground cinnamon
1/2 tsp mixed spice
60g butter, chopped
1 egg, lightly beaten
1/3 cup currants
1/3 cup dried cranberries

Paste for crosses:

1/2 cup plain flour
4 Tbsp water
2 tsp caster sugar

For the Glaze:

1 Tbsp very hot water
1 tsp gelatine powder
1 Tbsp caster sugar

Method:

1) Combine caster sugar, yeast and milk in a bowl, stir until smooth, cover and rest in a warm place for 10minutes or until frothy.

2) Sift flour, salt, cinnamon and mixed spice into a large bowl. Use your fingertips to rub butter into flour mixture.

3) Stir in yeast mixture, egg and currants until well combined. Cover and rest in a warm place for 45 minutes or until mixture has doubled in size.

4) Preheat oven to 220 degrees. Turn dough onto a lightly floured surface and knead until smooth and elastic (about five minutes).

5) Divide dough into 16 even pieces and roll into balls. Place balls into a lightly greased square cake pan lined with baking paper.

6) Rest covered for 10-15 minutes or until balls have risen to the top of the pan.

7) Combine paste ingredients in a small bowl and, using a piping bag fitted with a small plain nozzle or a plastic bag with a snip off one corner, pipe crosses over buns.

8) Bake for about 18 - 20 minutes or until well browned and cooked.

9) Combine glaze ingredients in a small bowl and stir until sugar is dissolved. Brush buns with warm glaze and cool on a cake rack. Can be stored in an airtight container for two days .


Saturday, September 20, 2008

No-Bake Cheesecake


I was feeling guilty and felt it was time for some hubby indulgence. Before you start thinking of all sorts of things, I'd better let you know that the "indulgence" bit is baking and not ahem (I leave your imagination to run wild at this point)... and what else but a cheesecake which is my dear's favourite dessert.

Here's a basic technique for a no-bake cheesecake which I've used in the past which can accommodate any number of flavor combinations. The biscuit base can be made with a variety of biscuits and wafers such as Ginger Snaps, Nilla wafers with ground cardamom, peppermint Milanos, oreos, and the cream cheese can be flavored with the zest and juice of any citrus fruit, vanilla extract or a swirl of berry or mango coulis or fresh chopped fruits added to the cheese. Taste as you go along, and the method is foolproof.

Here's my version!


No-Bake Cheesecake with Chocolate Swirls

Ingredients:

225g digestive biscuits, any flavor
85g unsalted butter, melted
452g (2 packets of 8-oz full-fat cream cheese)
1 cup heavy cream
3/4 cup sugar (or to taste)
1/4 cup lemon juice
2 tsp lemon zest
1 tsp lemon extract
1/4 cup bittersweet chocolate (melted)
2 1/2 tsp (1 envelope) powdered gelatin mixed in 2 tbsp very hot water

For the Raspberry Coulis:

1 1/2 cups frozen raspberries
1/3 cup sugar
1 Tbsp lemon juice

Add all ingredients into a saucepan. Stir over a medium heat until all ingredients are combined and the raspberries turns into a pulp. Remove from heat and strain the sauce thorugh a metal sieve to remove all the seeds. Place bowl in the refrigerator to cool.

Method:

1) Crush the biscuits into a fine powder in a food processor (alternatively, place in a large ziploc bag and crush with a can of soup or a rolling pin).

2) Transfer crumbs in a medium bowl and pour the melted butter over it. Stir until the crumbs are evenly moistened.

3) Lightly grease the sides of a 9-inch springform tin and press buttered crumbs onto the base to make a crust. Use the base of a wine glass to ensure the crust is even. Refrigerate.

4) Meanwhile, place cream cheese, heavy cream, sugar and lemon zest into a large bowl and whip to a fluffy mousse with an electric handheld beater. Then add in the lemon juice and lemon extract and whip for another minute.

5) Mix powdered gelatin and hot water in a small bowl. Add the gelatine to the cream cheese mixture and beat until thoroughly combined.

6) Pour half the mousse over the chilled crust and smoothen out. Then pour over the mousse mixture half of the melted chocolate in circular patterns starting from the outer base to the inner center. Using a sharp knife, cut across the chocolate to create a spider-web effect.

7) Pour the remaining mouse on top and spread evenly. Again pour the remaining the chocolate to repeat the spider-web effect on the surface of the cheesecake.

7) Refrigerate for at least four hours or preferably overnight. Use the edge of a sharp knife to ease the filling from the sides, and unmold. Serve with the prepared raspberry coulis.


Wednesday, September 17, 2008

Thai Pork Salad with Kaffir Lime Dressing


I'm not sure why I decided to make this salad but probably because I had a craving for Thai food. So it was with this in mind that prompted us to visit the Thai supermarket at Golden Mile Complex. Besides housing a supermarket, this complex also has small eateries, travel businesses, money changers, hair saloons and other small establishments that cater to the local Thai community.

There is a particular eatery here which both my husband and I really like because they do a very good Thai beef ball noodle. Their other scrumptious dishes includes phad thai, som tam (spicy mango salad) and minced chicken fried in spicy basil.

This is a really simple and hardly takes long to put together. It's also full of flavours due to the amount of herbs and garnishing used. You can opt to have this as a light lunch or alternatively serve it as a side salad.

Thai Pork Salad with Kaffir Lime Dressing
(serves 4)

Ingredients:

500g pork fillets (you can also use chicken fillets or shelled praws)
2 Tbsp grated palm sugar
1 Tbsp finely grated lime rind
2 tsp peanut (or vegetable oil)
2 cups of watercress, trimmed
1 cup loosely packaged thai basil leaves
1 cup loosely packed fresh coriander leaves
1/2 cup loosely packed mint leaves
1 1/2 cups bean sprouts
1 medium green capsicum, sliced thinly

Ingredients for Kaffir Lime Dressing:

3 cloves garlic, crushed and finely minced
4 shallots, sliced thinly
1 fresh red chilli, sliced thinly
3 fresh kaffir lime leaves, sliced thinly
1/3 cup lime juice
1/4 cup fish sauce
2 tsp grated palm sugar (to taste)

Method:

1) Cut pork fillets in half horizontally. Combine sugar, rind and oil in large bowl. Add sliced pork and toss to coat in mixture. Cook pork in batches in a heated lightly oiled frying pan over medium heat for about 15 minutes, or until cooked.

2) Meanwhile, place kaffir lime dressing ingredients into a screw top jar and shake well. Alternatively you can mix everything into a bowl. Adjust to taste.

3) Place pork in large bowl with remaining vegetables and herbs. Add the dressing and toss to combine. Serve as a side dish or a light meal.

Sunday, September 14, 2008

Fresh Strawberry Tart

I had some friends coming over Saturday night and I decided that I'll do a strawberry tart for dessert. It'll go nicely with coffee and furthermore I think it's such an elegant dessert to be served after dinner. For this tart I purposely picked the brightest red of all the strawberry punnets that was displayed over the fruit counter. The redness of the strawberries will throw some colour to the pale yellow of the vanilla bean pastry cream.

I simply love this pastry cream which is from Dorie Greenspan's recipe book. It's so simple and versatile as it can be used as a filling for most tarts, eclairs and danish pastries.

Fresh Strawberry Tart

Sweet Pastry Dough
Recipe from Dorie Greenspan’s book “Baking: From My Home to Yours”

Ingredients:

1 1/2 cups all-purpose flour
1/2 cup confectioners’ sugar
1/4 tsp salt
113 g unsalted butter, chilled and cubed
1 large egg yolk

Method:

1) Preheat the oven to 375 F (190C) degrees.

2) Pulse flour, sugar and salt in a food processor. Add butter and pulse until it resembles a coarse meal. Stir in the yolk and pulse again until the dough forms clumps and curds.

3) Turn the dough out onto a work surface and very lightly and sparingly, knead just to incorporate dry ingredients.

4) Butter a 9-inch fluted tart pan with a removable bottom. Press the dough evenly over the bottom and up the sides of the pan. Freeze crust at least 30 minutes before baking.

5) Bake blind for 25 minutes, remove the weight and bake for another 10 minutes. Let cool.

Pastry Cream
Recipe from Dorie Greenspan’s book “Baking: From My Home to Yours”

Ingredients:

2 cups whole milk
6 large egg yolks
1/2 cup sugar
1/3 cup cornstarch, sifted
1 vanilla bean pod, scrap out the seeds
50 g unsalted butter, cut into bits at room temperature

Method:

1) Bring the milk and vanilla pod seeds to a boil in a small saucepan.

2) In a heavy-bottomed saucepan, whisk the yolks together with the sugar and cornstarch until thick and well blended. Still whisking, drizzle in about 1/4 cup of the hot milk. Whisking all the while, slowly pour in the remainder of the milk.

3) Put the pan over medium heat and, whisking vigorously, contstantly and thoroughly bring the mixture to a boil. Keep at a boil, still whisking, for 1 to 2 minutes, then remove the pan from the heat.

4) Let sit for 5 minutes, then whisk in the bits of butter, stirring until they are fully incorporated and the pastry cream is smooth and silky.

5) Scrape the cream into a bowl. Press a piece of plastic wrap against the surface of the cream to create an airtight seal and refrigerate until cold or, if you want to cool it quickly put the bowl into a larger bowl filled with ice cubes and cold water and stir the pastry cream occasionally until it is thoroughly chilled, about 20minutes.

6) The pastry cream can be kept, tightly covered, in the refrigerator for up to 3 days.


To Assemble the Tart:

1) Pour the pastry cream into the pie shell and smoothen out.

2) Remove the stems from whole strawberries and arrange in circles, sticking the cut side down into the pastry cream.

3) Glaze the strawberries with some strawberry jam diluted with a bit of warm water.

4) Optional: Shave some chocolate curls on top of the tart and serve.

Wednesday, September 10, 2008

Durian Puffs

If you are not staying in Asia, you will probably have no clue what is a durian. And if you do, you'd either love it or hate it ... I'm in the love circle!

The durian is indigenous to Southeast Asia and can be found in many of the region's low-lying forests. It is most commonly cultivated in Malaysia and Thailand and holds the distinction of being the most highly-prized fruit in the region. It's also a seasonal fruit and can be found plentiful during the non-monsoon periods.


In Asia, the durian is known as the “king of fruits” because of its large size, its thorn covered shell and its “unique” odour. Short of hacking it open with an axe, it is a pretty tough fruit to open, and there is an art to this. The most distinctive characteristic of the fruit has to be its odour, some may find it fragrant whilst others cringe, short of puking as well! Its odour is so strong that it can fill up a room as quickly as oxygen. If you were to keep a durian in the fridge, everything else would absorb it's smell (something not very nice even for durian lovers). Many people have never tried it simply because they are put off by its smell. Did you know that durians are ban in most hotels in Asia and in Singapore it is no exception. In fact it's ban on public transportation and even on airplanes.

Once the fruit is opened, you’ll be able to see the yellow flesh of the fruit all lined up in a row. The texture of the flesh is creamy like custard. Its taste can either be sweet or bitter. Some people prefer the sweet ones but it is the bitter ones that durian lovers search for.

A dissenting opinion: Charles Darwin, who was a contemporary of Alfred Russell Wallace, did not like durian, and someone wrote this witty limerick:

The durian...neither Wallace nor Darwin could agree on it.
Wallace said, "It's delicious"
Darwin said,"I'm suspicious, for the flavor is scented like papaya fermented after a fruit-eating bat has pee'd on it."


Not only can the durian be eaten like any other fruit, it can be used to jazz up many local desserts. One very popular one here in Singapore is durian puffs. The quality of a durian puff is rated not by its choux pastry but rather the durian pulp which is used as it's filling. Both my husband, myself and you wouldn't believe it our two shitzus as well. simply love this dessert! One or two is simply not enough!

Durian Puffs

Ingredients for Choux Pastry:

1 cup water
4 Tbsp unsalted butter
1 cup plain flour, sifted
3 eggs

Ingredients for the Durian Filling:

200g of durian pulp
200ml of whipping cream
2-3 tsp of honey
2 tsp of milk

Whip the cream until stiff, then add in the durian pulp, honey and milk. Mix well and then place in the refrigerator until ready for use.

Method for the Choux:

1) Place the water and butter in a saucepan and cook over a gentle heat until the butter has melted and the water boils. Remove from stove, add all the sifted flour and stir vigorously with a wooden spoon until all is combined. Return to the heat and stir continuously over the low flame until the mixture forms a ball. This should be about 2 minutes. Remove from stove and cool for about 5 minutes.

2) Add the eggs one at a time, beating well after each addition. The pastry should be soft to touch and when you lift it with the spoon it should fall back into the bowl forming a V shape as it falls off the spoon.

3) Grease a baking tray with butter and sprinkle it with cold water. Place pastry into a pastry bag (or you could use a ziplog bag, cut about 1/2" off one corner of the bag) and pipe small balls of pastry on the tray. (I used a big star tip and piped small swirls onto the baking tray)

4) Bake in a pre-heated oven at 200C for 10 minutes, reduce heat to 180C and bake for a further 20-30 minutes or until the puffs are golden and fall lightly in the hand. Remove tray from oven and pierce the puffs to allow the steam to escape. If you are able to, you can also make a cut each puff 3/4 way across. Cool puffs in a draught-free area. (If you find the insides of the puff still slightly moiste you can pop them back into the oven for a short while to dry out the insides)

5) Once the puffs are completely cooled, fill with the durian filling. Refrigerate all filled puffs. To serve remove from refrigerator and dust with some icing sugar.


Monday, September 8, 2008

Better-Than-Ever Cheesy Meat Lasagna

It was one of those Friday nights when we would debate on whether to eat out or in. Such is life when simple decisions become a major issue!

Luckily I was in the mood to cook that evening. Simply because the weekend before I had accidentally added a container of low fat cottage cheese to my basket of groceries. I couldn't figure out what I could do with the cheese and resorted to the ever reliable INTERNET and came across a simple lasagna recipe.

Hmmm! Would you believe that I have not made lasagna before. There is always the first time and my motto is "if you don't try, you'll never know!" I grabbed the remaining ingredients from a nearby supermarket after I knocked off from work.

Upon reaching home, I cleared up a bit of the apartment, fed my two "boys" (my two shitzus that is) and started preparing the lasagna. The original recipe called for an hour cooking time but I shortened it to about 45 minutes and it still came out nicely baked. The lasagna turned out absolutely yummy! My husband who loves pasta had 3 huge servings before he was fully satisfied. This is an absolutely simple recipe to follow and I've already made a note to add this to my year-end Christmas luncheon.

Cheesy Meat Lasagna

Ingredients:

3/4 lb ground beef (you can substitute with minced chicken or pork)
3 garlic cloves, minced
1 medium size onion, chopped
1 1/2 tsp dried oregano leaves
1 1/2 tsp mixed herbs
2 dried bay leaves
1 (26 ounce) bottle spaghetti sauce
1 can chopped tomatoes (drained)
1 egg
1 (16 ounce) container low fat cottage cheese
1/4 cup grated parmesan cheese
9 lasagna noodles, cooked, drained
1 1/2 cups grated reduced-fat mozzarella cheese
1/2 cup grated reduced-fat cheddar cheese
2 Tsp olive oil
Salt and pepper to taste

Directions:

1) Preheat oven to 375 F or 180 C. Fry the onion and garlic in olive oil until soften. Add in the minced meat and brown for about 5 minutes. Stir in the spaghetti sauce, bay leaves and herbs, mix all ingredients together and simmer for about 10 minutes stirring occasionally.

2) Add in the canned tomatoes and simmer for another 5 minutes. Season with salt and pepper to taste. Remove from stove and set aside.

3) Mix egg, cottage cheese and Parmesan cheese and divide this into 3 portions. Spread a thin layer of the spaghetti sauce mixture onto bottom of 13x9-inch baking dish. Top with a layer of noodles, 1/3 of the spaghetti sauce mixture, 1 portion of the cottage cheese mixture and sprinkle with a layer of mixed mozzarella and chedder cheese. Repeat with another 2 more layers until you have 3 layers of lasagna. The top layer should be the sprinkle of mozzarella and chedder cheese.

4) Cover the baking dish with foil so as not to burn the lasagna during the initial cooking stage.

5) Bake for 30 minute or until heated through. Remove the foil and bake for a further 10 - 15 minutes. During the last few minutes of baking time you can shread some basil leaves and sprinkle on top of the lasagna.

6) Remove from oven and stand for 5 minute. Serve with sprigs of basil.

Thursday, September 4, 2008

Chocolate Chip Peppermint Ice-Cream


I was in the mood of making ice-cream again and this time it has to have chocolate in it. I've made ice-cream on two separate occassions without an ice-cream maker. This time round is no different - takes a little bit more time but the end result is still good.

Recently I had purchased a variety of extract flavours ... the more expensive stuff, not the cheaper artificial flavours that cost under $3 which is readily available from the neighbourhood supermarket. I bought these from a cookery school and the flavours were orange, lemon, rose water and peppermint extract. Now I wonder what goes well with chocolate? Hmm why not a chocolate chip peppermint ice-cream.

I do love mint and for sure the peppermint would add a refreshing taste to the ice-cream. As I was using valhora 70% cocoa, the chocolate peppermint ice-cream turned out just right - not too sweet and not too rich! This can keep for about 2 weeks in your freezer.


Chocolate Chip Peppermint Ice Cream
(Makes 1 quart)

Ingredients:

1 cup milk
2 cups heavy cream (divided, 1 cup and 1 cup)
2/3 cup sugar (I had reduced the sugar slightly)
A pinch of salt
6 egg yolks
6 ounces dark chocolate, chopped in small pieces and kept in the freezer until used (I used Valhora chocolate)
2 tsp peppermint extract (I added an additional tsp for extra minty taste)

Method:

1) In a saucepan, add 1 cup of milk, 1 cup of cream, sugar and salt. Heat until just steaming (do not let boil). Remove from heat and leave aside.

2) In another bowl, whisk the egg yolks in a medium sized bowl. Slowly pour the heated milk cream mixture into the egg yolks, whisking constantly so that the egg yolks are tempered by the warm mixture, but not cooked by it. Scrape the warmed egg yolks back into the saucepan.

3) Return the saucepan to the heated stove, stirring the mixture constantly over medium heat with a wooden spoon, scraping the bottom as you stir. The mixture will then thicken. Using the back of a wooden spoon, run your finger across the coating. If it does not run, it means the mixture is ready. This can take about 10 minutes.

4) Once the custard is ready, remove from the heat immediately and pour through a sieve over an ice bath to stop the cooking process.

5) Stir in the remaining cold cream into the mixture and pour into a container. Chill thoroughly for at least 2 hours in the refrigerator.

6) Once chilled, move the container into the freezer for about 2 hours until the sides form a layer of crystals. (If you are using an ice-cream maker, follow the manufacturer’s instructions)

7) Remove ice-cream from the freezer and gently fold in the finely chopped chocolate and peppermint extract. Stir well and replace back into the freezer. After about 2 to 3 hours, remove the container from the freezer and using a spoon vigorously stir the mixture until it resembles slush. Repeat this process for another 2 more times. Freeze overnight. To serve, remove container from freezer and let the ice-cream soften slightly.

Related Posts with Thumbnails